PrestaShop
![]()
IMPORTANT NOTICE! Before installation; If there is a PayTR Payment Module installed, it must be removed. Otherwise, the module will not work correctly.
STEP 1: Requirements for module installation;
- You can automatically install the paytr_prestashop.zip file you downloaded by selecting the Install Module option in PrestaShop. If you cannot install with the above method; Extract the zip file you downloaded and paste the paytrcheckout folder into the public_html/modules folder by accessing the folder structure of your website via ftp connection.
- Login to the Admin panel of your PrestaShop software.
For versions 1.7.X and above;
- Find the module by searching as PayTR under the Module Catalog from the menu and perform the installation process.
- After the installation process is completed, you can reach the module page by clicking the Configure Button and complete the installation by entering the API Integration Information.
- If the Configure Button is not visible, you can follow the steps below. o Access the Module Manager page under Modules from the menu. o Find the PayTR Virtual POS module under the Other heading in the Listed Modules. o Complete the relevant settings by clicking Configure.
For versions 1.6.1.x;
- You can find the PayTR Virtual POS module by searching for PayTR under Modules from the menu or clicking on Payments and Gateways.
- After the installation process is completed, you can reach the module setting page by clicking the Configure Button.
INFORMATION: You can find the API Integration Information required for the module under the Information menu by accessing https://www.paytr.com/magaza.
STEP 2: Configuration of notification address;
- Login to PAYTR Store Panel (https://www.paytr.com/magaza) and click on the Settings link.
- Click on the Change link in the Notification URL Setting section.
- As a notification to this section, edit the address “http://WEBSITEADDRESS/index.php?fc=module&module=paytr&controller=notification" according to your site and click the SAVE button to save your settings.
- IMPORTANT NOTICE: Your notification URL is in the Paytr Merchant Panel > Settings > Notification URL settings section, if your site has SSL, you must set the notification URL protocol to HTTPS. If you do not have an SSL certificate,do not use an HTTPS link. If you have set up SSL after PayTR integration on your site, go to the notification URL settings section and save it by changing the protocol to HTTPS. If you cancel the SSL certificate on your site after installation, go to the notification URL settings section and save it by changing the protocol to HTTP.
- IMPORTANT NOTICE:: If the status of test payment is displayed as "Successful" (Başarılı) on the Transactions (İşlemler) page on PayTR Merchant Panel (Mağaza Paneli), the PayTR integration is complete.If the status of test payment is displayed as "In Progress" (Devam Ediyor), it means that the PayTR system has not received "OK" response from the Callback URL. Click on the "Detail" (Detay) link of the test payment on the Transactions page and check what response PayTR system receives from the Callback URL to debug.
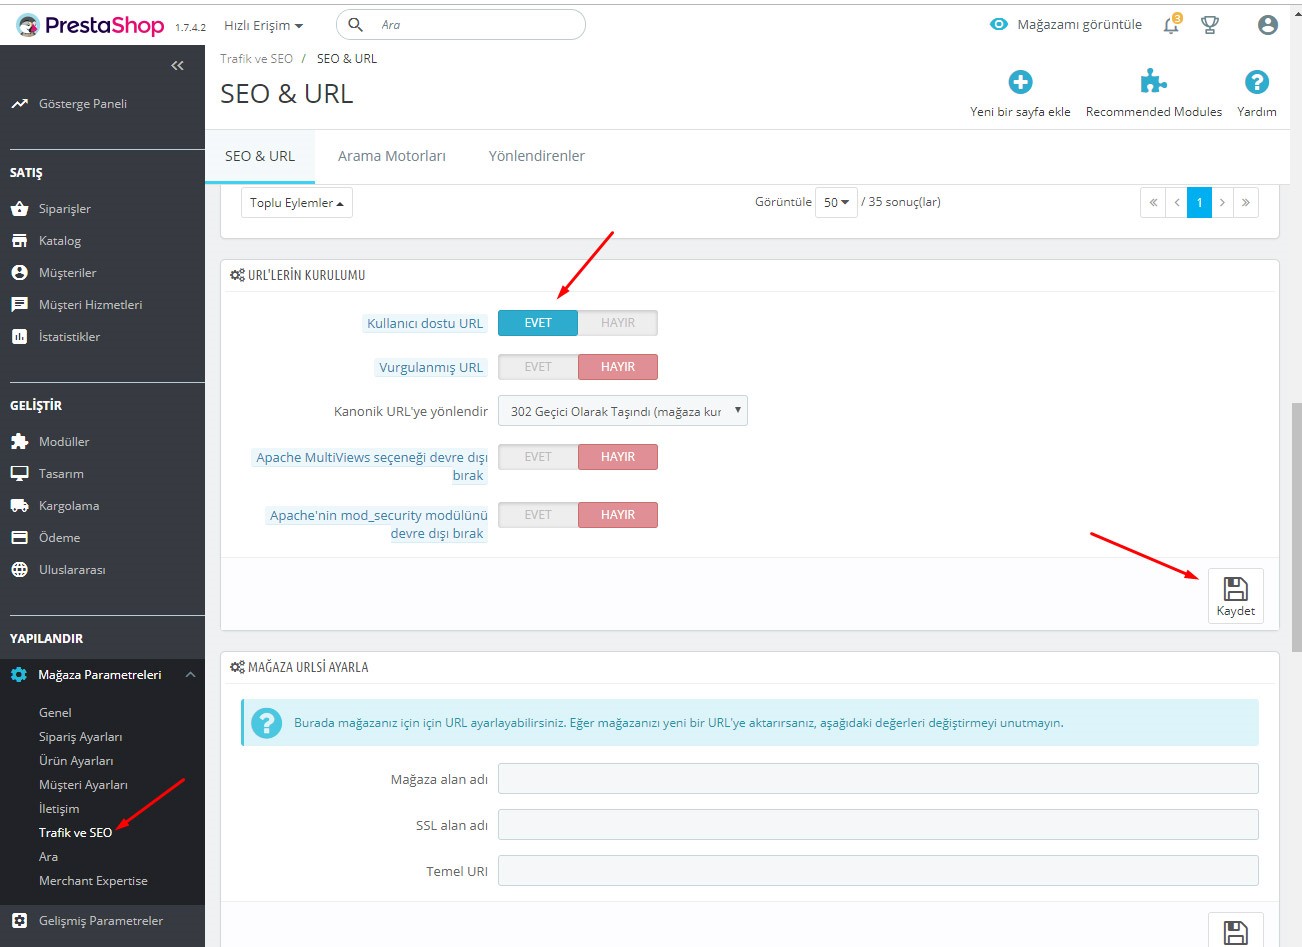
- SEO URL CONFIGURATION: In order for the redirects to work correctly, the SEO URL structure on your site must be in accordance with the image below.
You can download PrestaShop 1.6.x and 1.7.x modules below. Also, if you want to use the PrestaShop iFrame API Installment Module, you can download the appropriate module for your version and make the installment table appear on the product page.
PrestaShop For versions 1.6.x and 1.7.x iFrame API
PrestaShop iFrame API 1.6.x Installment Table - (The installation document is in the file)
PrestaShop iFrame API 1.7.x Installment Table - (The installation document is in the file)